Start your free 3-day trial — no credit card required, full access included

Robot-assisted right adrenalectomy

Reading time readingtime 58:08 min.
Activate now
  1. Positioning

    Positioning 1
    Positioning 2

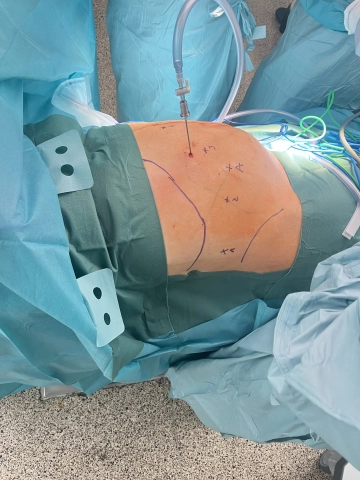
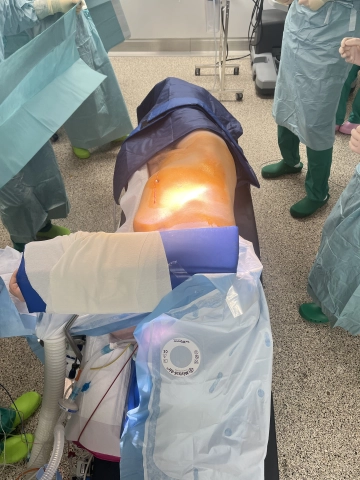
    The patient is positioned in a modified left lateral position (semi-lateral position) on a large vacuum mattress. The patient is rotated approximately 45–60° to the left, so that the right flank is optimally exposed.

    The right arm is usually extended ventrally on an arm support, while the left arm can likewise be extended or fixed to the body.

    Through the use of the vacuum mattress, additional supports can usually be dispensed with, provided that a stable position is ensured.

    After inserting the trocars, the operating table is placed in a slight anti-Trendelenburg position (approximately 10–20°) as well as an additional tilt to the left (tilt left) in order to displace the abdominal organs caudally and medially and to improve exposure of the right adrenal gland and the inferior vena cava.

    All extremities as well as all pressure-prone areas (in particular the elbows, knees, iliac crests and shoulders) are carefully padded.

    A protective bar for the face is recommended to avoid injuries from the robotic arms.


    Caution:

    Vacuum cushions may develop leaks. The stability of the positioning must be re-checked before sterile draping.


    Caution:

    Positioning is of particular importance due to the docking to the robotic system.
    There is an increased risk of shear forces and slipping of the patient, in particular in lateral tilt and anti-Trendelenburg position. Secure fixation is mandatory.


    Note:

    With coupled operating tables (“Table Motion”) – particularly with the Da Vinci Xi system – intraoperative repositioning is possible without undocking.

    In the absence of Table Motion technology or when using other systems, the robot must be undocked and moved away from the operating table before any change in positioning.

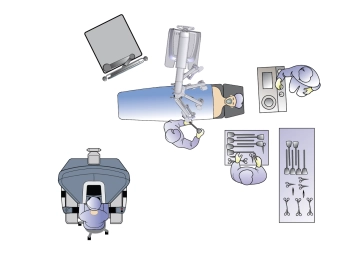
    The following setup applies:

    • Surgeon at the console, ideally with a direct line of sight to the patient and the table assistant
    • Table assistant on the left side of the patient, with good access to the assistant port
    • Anaesthesia at the head of the patient, with unrestricted access to the airway and monitoring
    • Patient cart (robot) is generally docked from the right (patient side), corresponding to the target region (right adrenal gland)
    • Scrub nurse is positioned next to the table assistant on the left side of the patient, with direct access to instruments and instrument changes
  2. Creation of the pneumoperitoneum, trocar positioning and docking

    Creation of the pneumoperitoneum, trocar positioning and docking 1
    Creation of the pneumoperitoneum, trocar positioning and docking 2
    Soundsettings

    Small skin incision in the left upper abdomen (Palmer's point). Insertion of the Veress needle. Safety check with aspiration and placement of a drop. Creation of a pneumoperitoneum of 12 mmHg. Due to the varying abdominal wall compliance, it is advisable to determine and mark the optimal position of the trocars on the inflated abdomen with pneumoperitoneum. Overall, it is advisable to use the lowest possible intra-abdominal pressure.

    Note: Alternatively, the pneumoperitoneum can also be created using the Optiview technique.

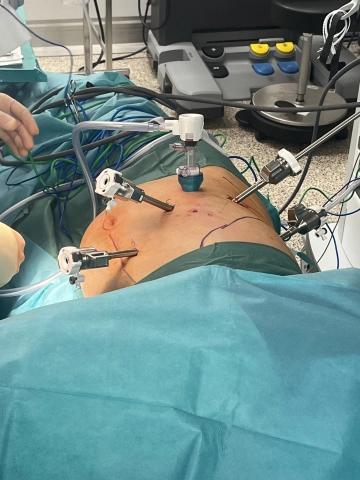
    A total of four robotic ports are used. The robotic trocars are placed along an oblique line below the costal margin, 15–20 cm away from the target anatomy.

    The trocars are placed symmetrically with a distance of approximately 8 cm between each of them.

    The arms are connected to the robotic trocars (docked). First, the targeting manoeuvre is performed. The instruments are then introduced under visual control and parked beneath the ventral abdominal wall.

    Instrument allocation with 2 right hands: 1: fenestrated forceps, 2 camera, 3 monopolar hook, scissors, vessel sealer, 4 TipUp

    Caution: The trocars must be positioned with the broad black ring (remote centre) at the level of the muscular abdominal wall (so-called remote control), in order to minimise the shear forces in the abdominal wall during movement.

  3. Checklist Before Docking

    • Positioning in semilateral position on the vacuum mattress (45° to the left)
    • Stab incision in the left upper abdomen, insertion of the Veress needle
    • Pneumoperitoneum to 12 mmHg
    • Marking of the spine/crest and costal margin
    • Mark an oblique line in the right upper abdomen parallel to the costal margin as well as the points for the trocars, assistant between 2 and 3
    • Insertion of an Xi trocar
    • Insertion of the camera by hand
    • Insertion of 3 further robotic trocars 8 cm apart from each other
    • Positioning: 12° anti-Trendelenburg
    • Dock the camera arm + introduce the camera
    • Targeting
    • Dock 3 further arms
    • Arms always a fist's width apart
    • Check the remote centres
    • Introduce the instruments and advance them into the target anatomy
    • Move to the console
Exposure of the Right Retroperitoneum and Mobilisation of the Liver

After cranial and medial mobilization of the liver, the right retroperitoneum is exposed step by st

Activate now and continue learning straight away.

Single Access

Activation of this course for 3 days.

US$9.06 inclusive VAT
Add to cart

Most popular offer

webop - Savings Flex

Combine our learning modules flexibly and save up to 50%.

from US$4.20 / module

US$50.48/ yearly payment

price overview

robotics

Unlock all courses in this module.

US$8.41 / month

US$100.96 / yearly payment

Add to cart
to top